How to Launch a Campaign, Start to Finish
Last updated August 6, 2026
A campaign is a sequence of postcards — plus follow-up phone calls, if you're on Pro — sent to a list of contacts over several weeks. Building one happens in two parts. First you create the campaign in a four-step wizard, which takes about five minutes. Then you work through the Launch Checklist: design the postcard, approve a print proof, attach your contacts, set a return address, and fund your wallet. The second part is where the time actually goes.
Nothing you do in the wizard is permanent. It creates a draft, and every headline, offer, wave and date stays editable right up until you launch — and most of it stays editable after that.
The screenshots below are from an example dental account. Your industry's playbooks, wave names and copy will differ, but every screen and button is the same.
Before you start
Four things gate the Launch button. You can build the entire campaign without any of them, so there's no need to stop and gather everything first — but you won't be able to send until all four are done:
- An approved postcard design. You'll build this in Design Studio and approve a print proof. Covered in Part 2.
- Contacts with mailing addresses. Usually a CSV or Excel export from your practice-management or field-service software. See How to Import Contacts from a CSV File.
- A return address. This gets printed on every card and is what the post office does with undeliverable mail. Set it under Admin → Organization.
- Money in your wallet. You pay per piece as cards mail, not up front. See How PostKnock Pricing Works.
Part 1: Create the campaign
Four steps, about five minutes. Produces a draft.
Step 1 — Choose a starting point
Go to Campaigns in the sidebar and click New Campaign. The first screen asks the only question in the wizard that really branches:
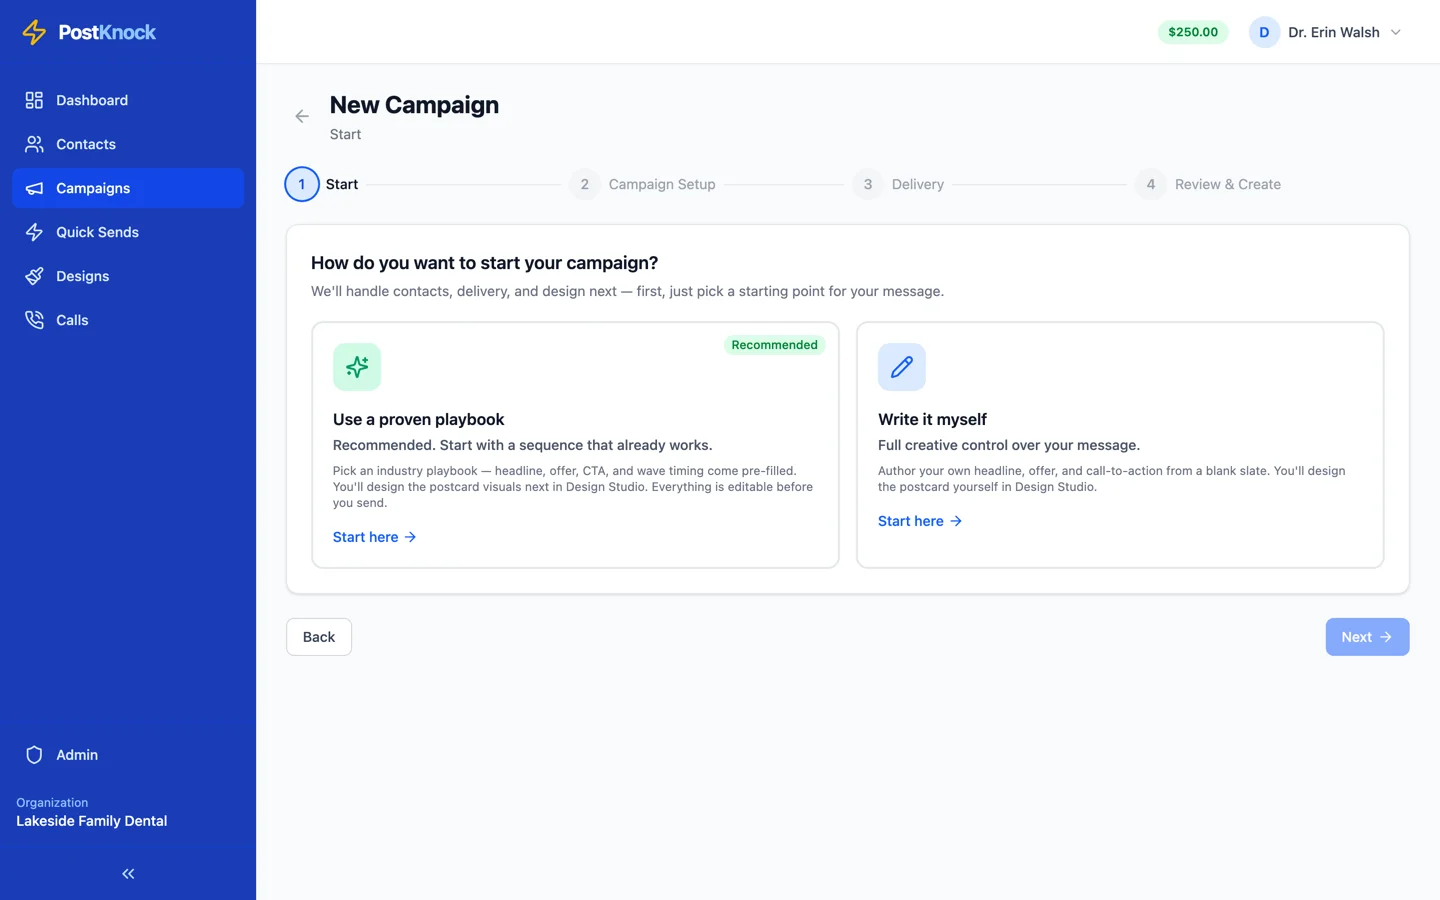
Use a proven playbook starts you from a sequence that already works for your industry: wave count, timing, and the headline, offer and call-to-action for each wave are filled in. Every word of it is editable afterwards.
Write it myself gives you a blank slate and you author the copy yourself. If this is your first campaign, take the playbook. It's much easier to edit a worked example than to write three waves of direct mail copy from nothing, and you can rewrite every field anyway.
Step 2 — Pick a playbook
The picker opens on your own industry rather than dumping every playbook on you at once. A dental account lands on the three dental playbooks; if you want something else, View other industries opens the full category browser.
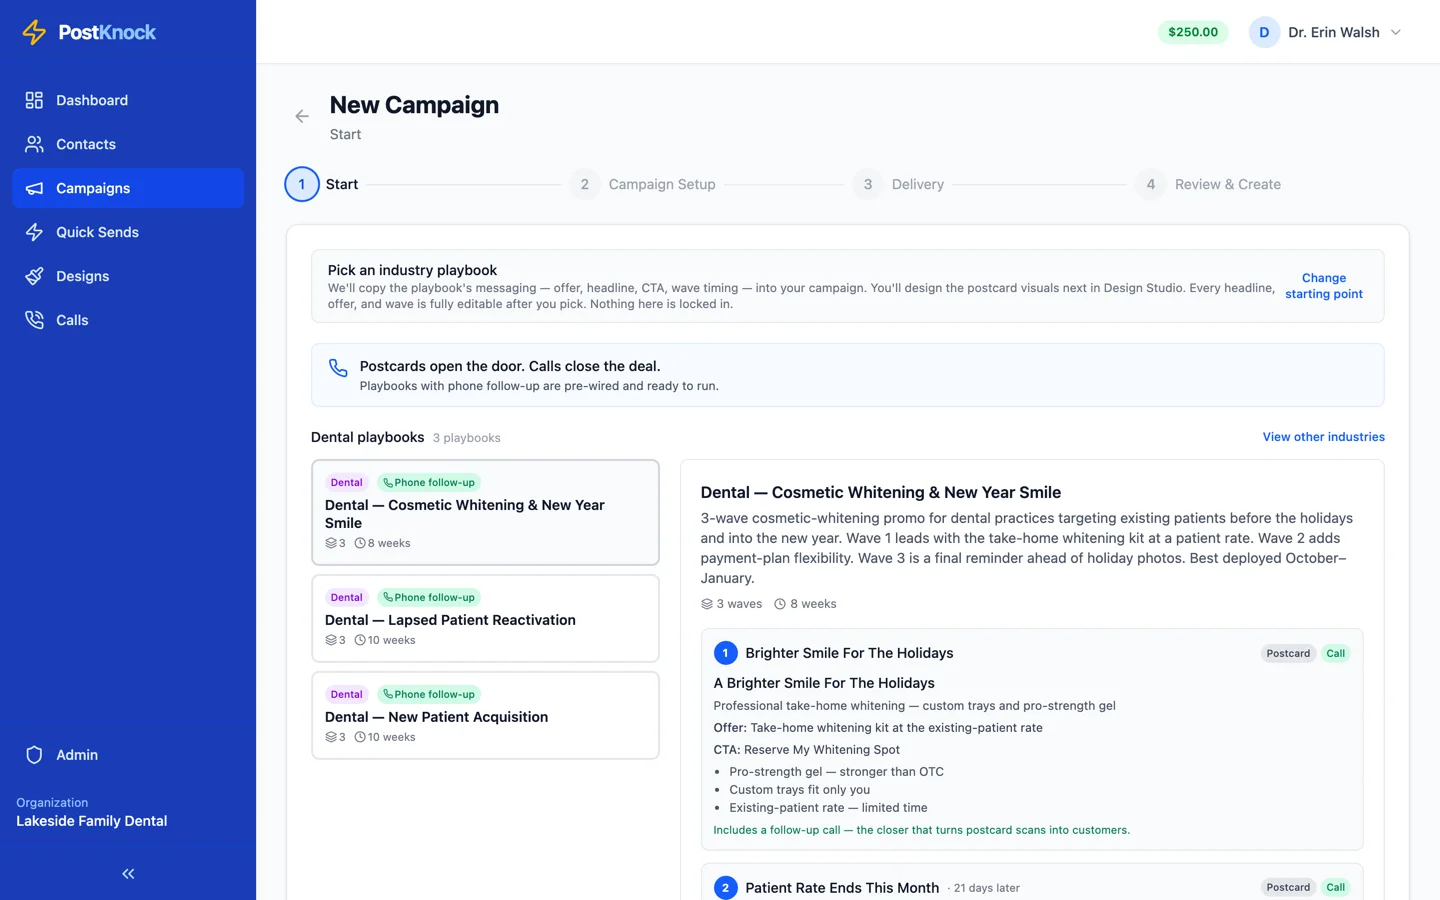
The right-hand panel is worth actually reading. It shows every wave in order with its headline, offer, CTA, bullets and the gap before it fires — so you can tell a three-touch reactivation sequence from a one-shot seasonal promo without opening anything.
A playbook carries the messaging: wave count, the timing between waves, the copy for each wave, UTM defaults, and the call script for waves that include a phone follow-up. It does not carry postcard artwork. Messaging and visual design are deliberately separate in PostKnock, so you can swap either without redoing the other. You'll build the artwork in Design Studio in Part 2.
Playbooks with a Phone follow-up badge include call waves. Those are a Pro feature: on the Free plan you can still pick the playbook and author every wave, but only wave 1 will actually send.
Step 3 — Name it and attach contacts
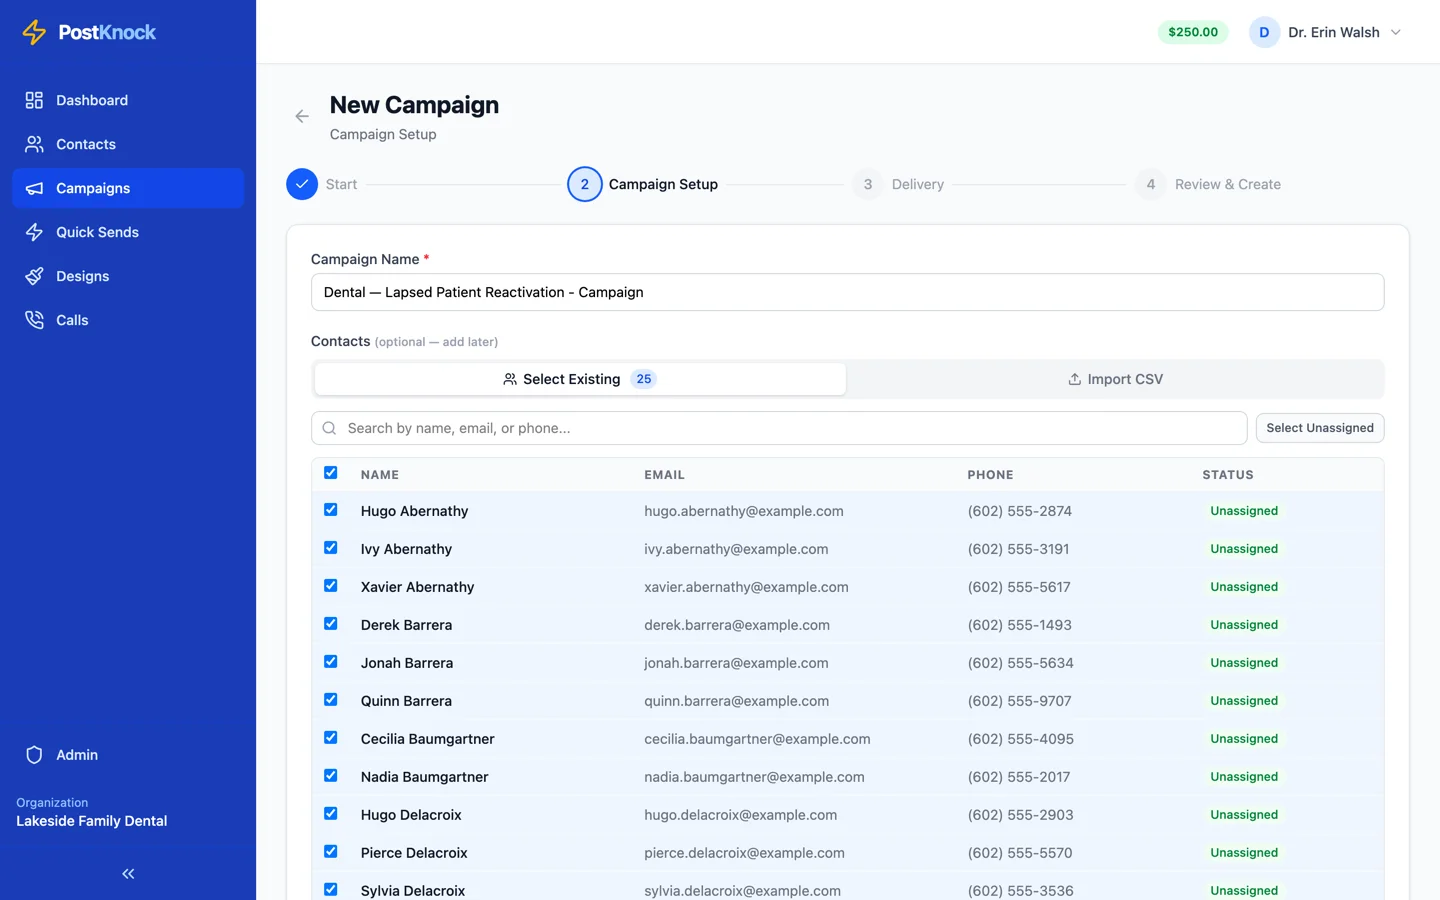
The campaign name is pre-filled from the playbook. Change it to something you'll recognise in three months when you have several campaigns running — "Lapsed patients — spring 2026" beats the default.
Contacts are genuinely optional at this point. Select Existing pulls from contacts already in your account, and Select Unassigned is a quick way to grab everyone who isn't already enrolled in another campaign, which avoids mailing the same person twice in a month. Import CSV uploads a fresh list without leaving the wizard. If your list isn't ready, skip it and keep going.
Step 4 — Choose a delivery pace
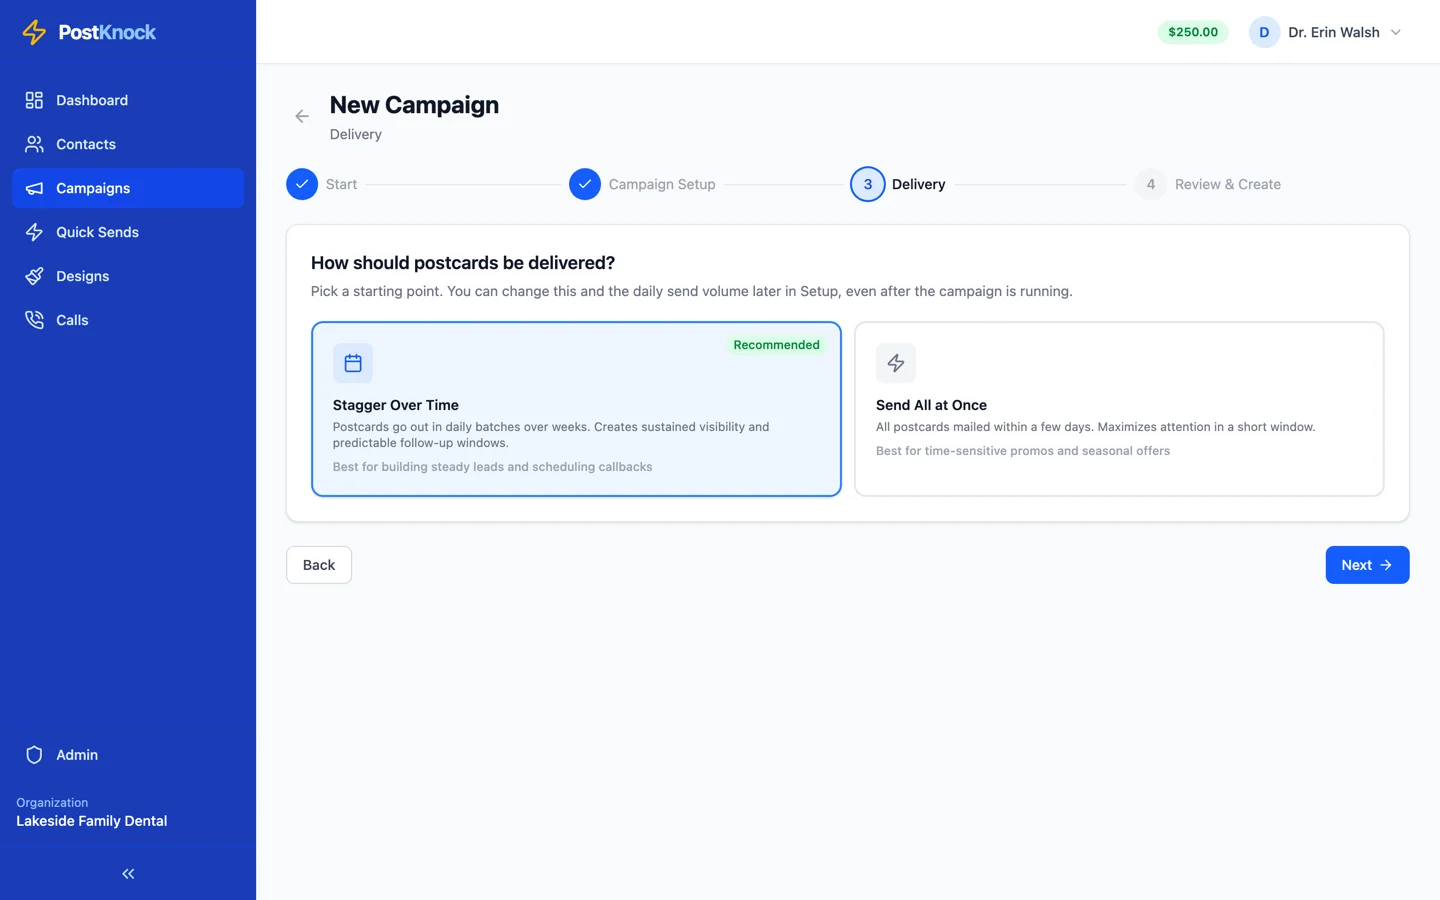
Stagger Over Time mails in daily batches over a few weeks. Send All at Once puts the whole list in the mail within a few days.
Staggering is the better default for a reason that isn't obvious: responses arrive in proportion to cards delivered. Mail 800 cards on a Tuesday and the phone calls land in one lump that your front desk has to absorb on top of a normal day. Spread the same 800 over three weeks and you get a manageable trickle you can actually follow up on. Send all at once when the offer has a hard deadline — a seasonal promo or an event — and the timing matters more than the pacing. Either way you can change it later, including after the campaign is running.
Step 5 — Review and create
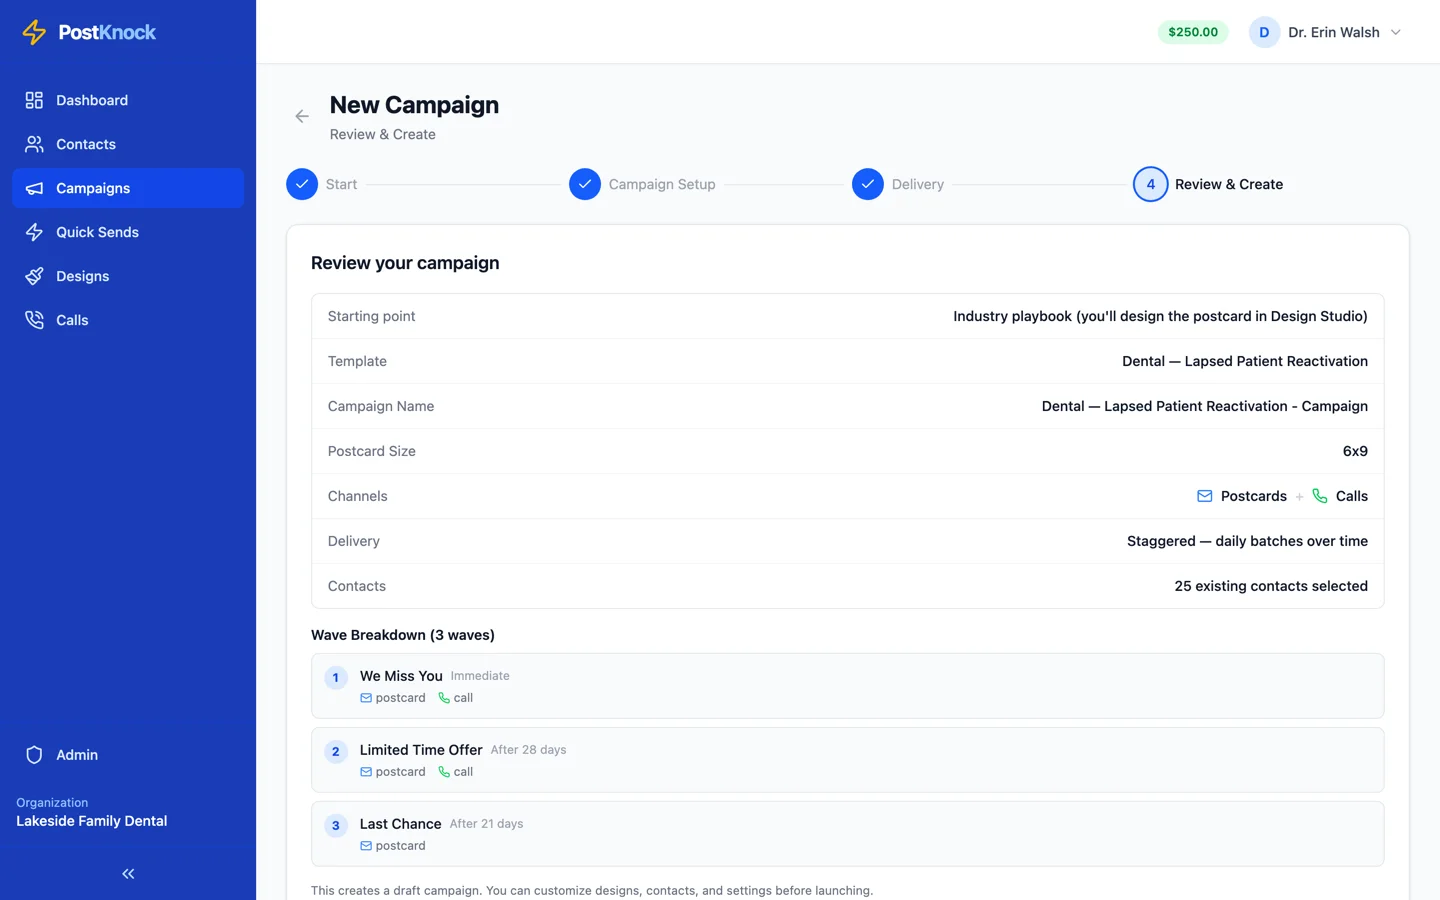
Check the wave breakdown before you click through. The gaps between waves come from the playbook and they add up: a three-wave sequence with 28 and 21 day gaps runs about seven weeks end to end. If that pushes your last touch past a date that matters, adjust the timing later in Advanced Settings. Clicking Create makes a draft campaign — nothing mails yet.
Part 2: Clear the Launch Checklist
Where the real work is. Plan on 20–30 minutes.
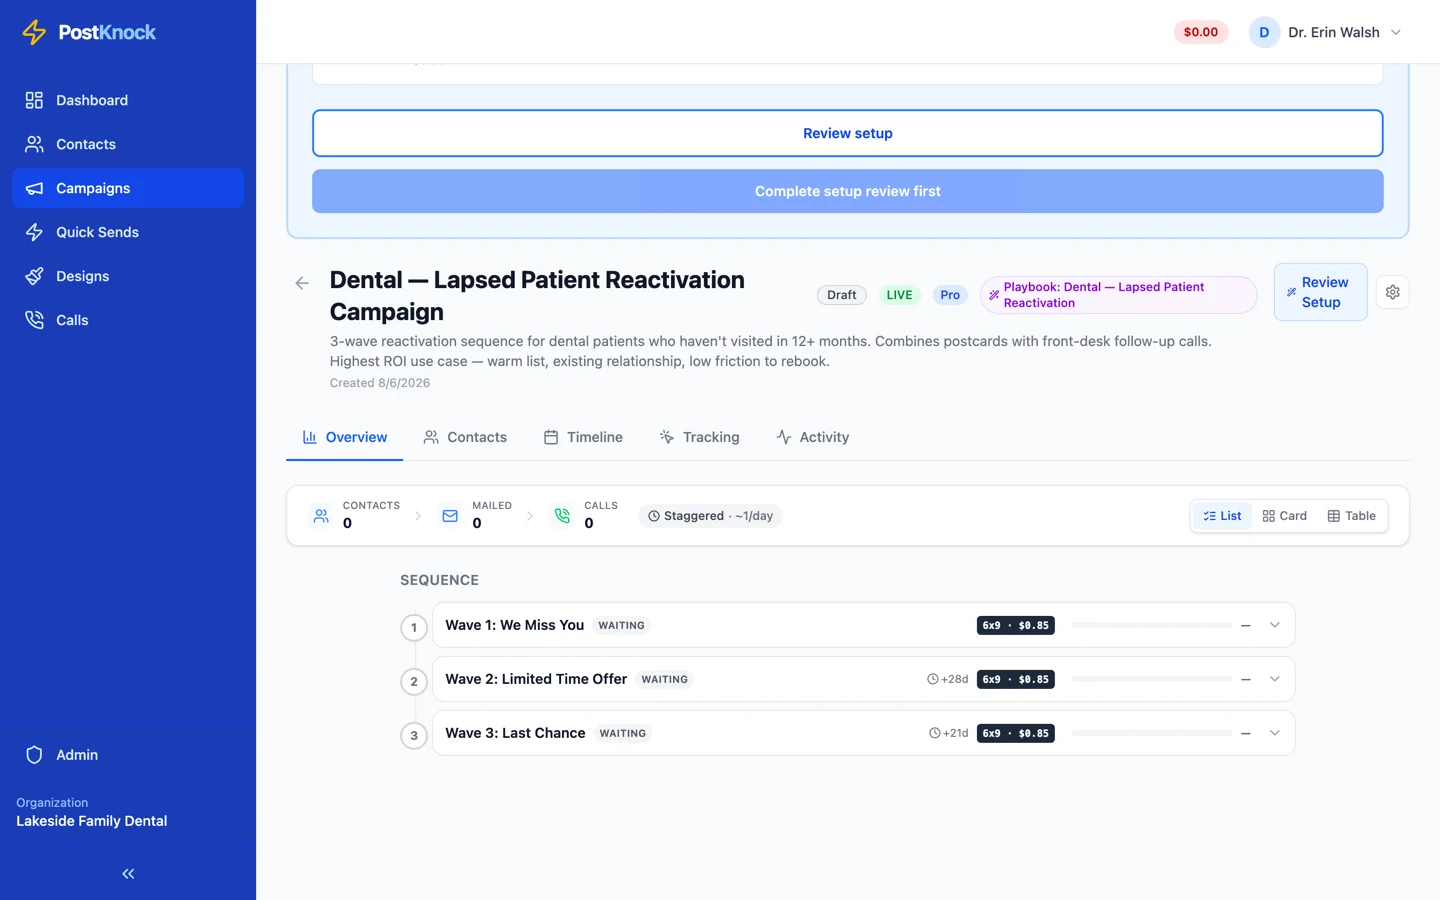
Creating the campaign drops you on its detail page, and the Launch Checklist is the first thing on it. Until all four items pass, the Launch button is disabled and reads Complete setup review first.
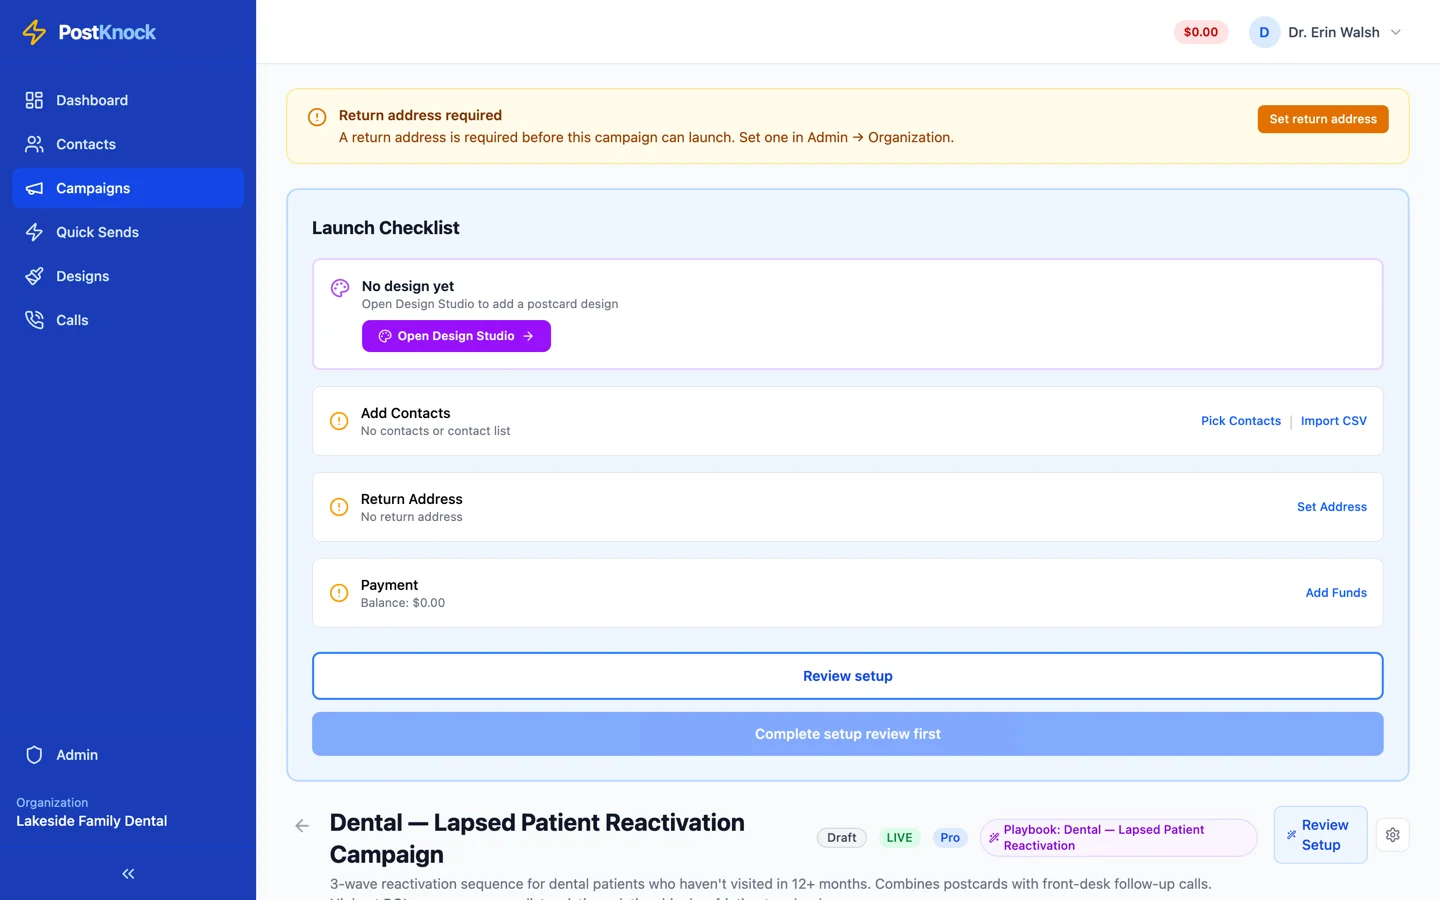
You don't have to do these in order, and you can leave and come back — the draft sits there indefinitely. Design takes the longest, so start there.
Design the postcard
Click Open Design Studio. The studio opens in an explore phase with four style directions across the top:
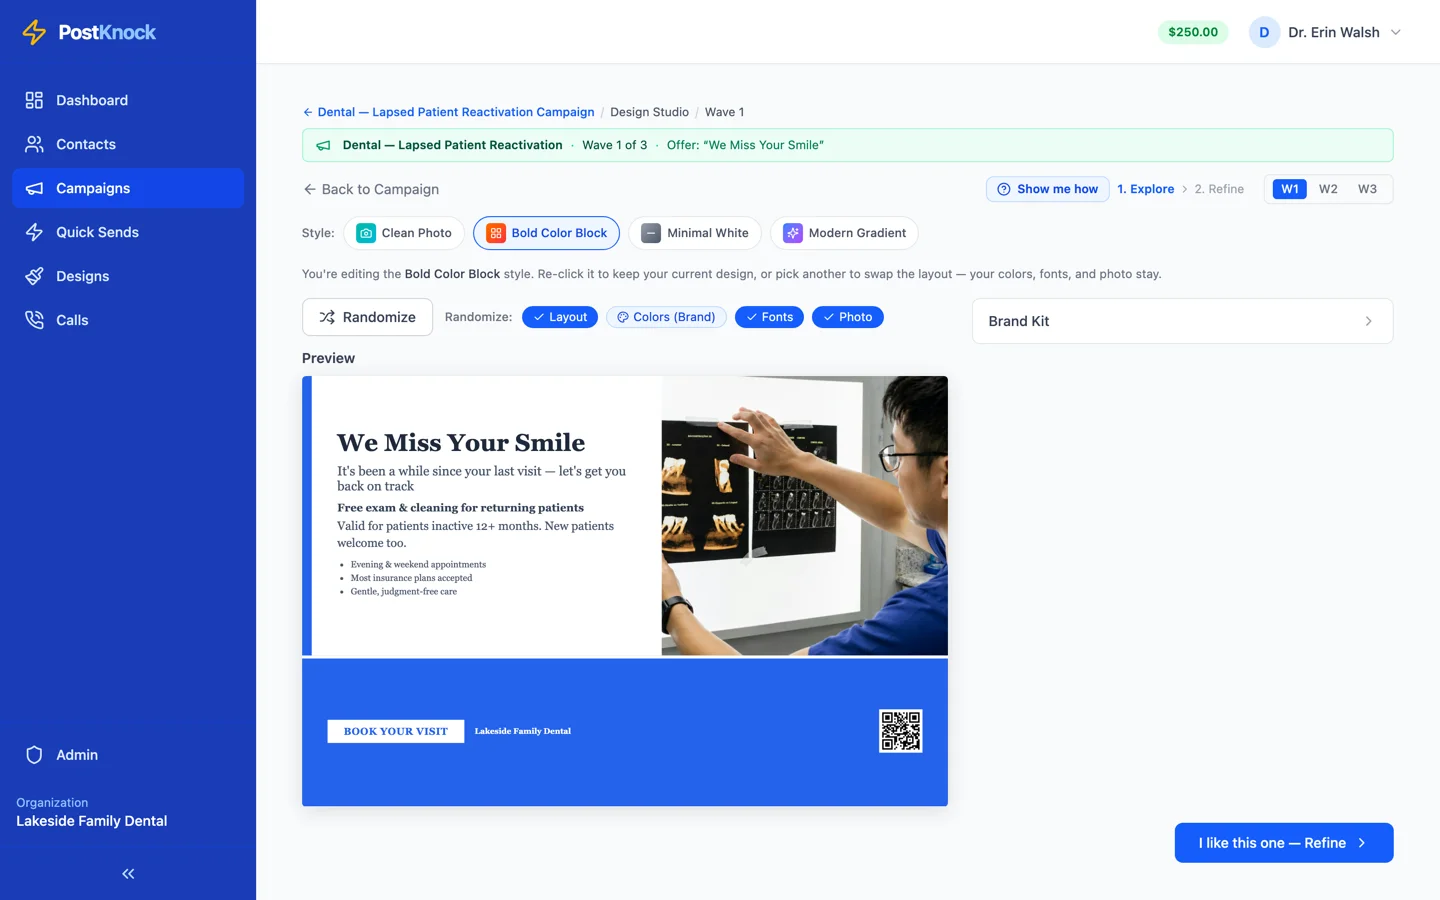
Clicking a style rebuilds the card in that direction. Randomize reshuffles it again, and the pills next to it — Layout, Colors, Fonts, Photo — control which parts are allowed to change. Switch off the ones you're happy with and keep shuffling the rest until something clicks. Set your logo and colours once under Brand Kit and every design starts from them; the Colors pill then shows Brand and leaves your palette alone.
When a direction looks right, click I like this one — Refine.
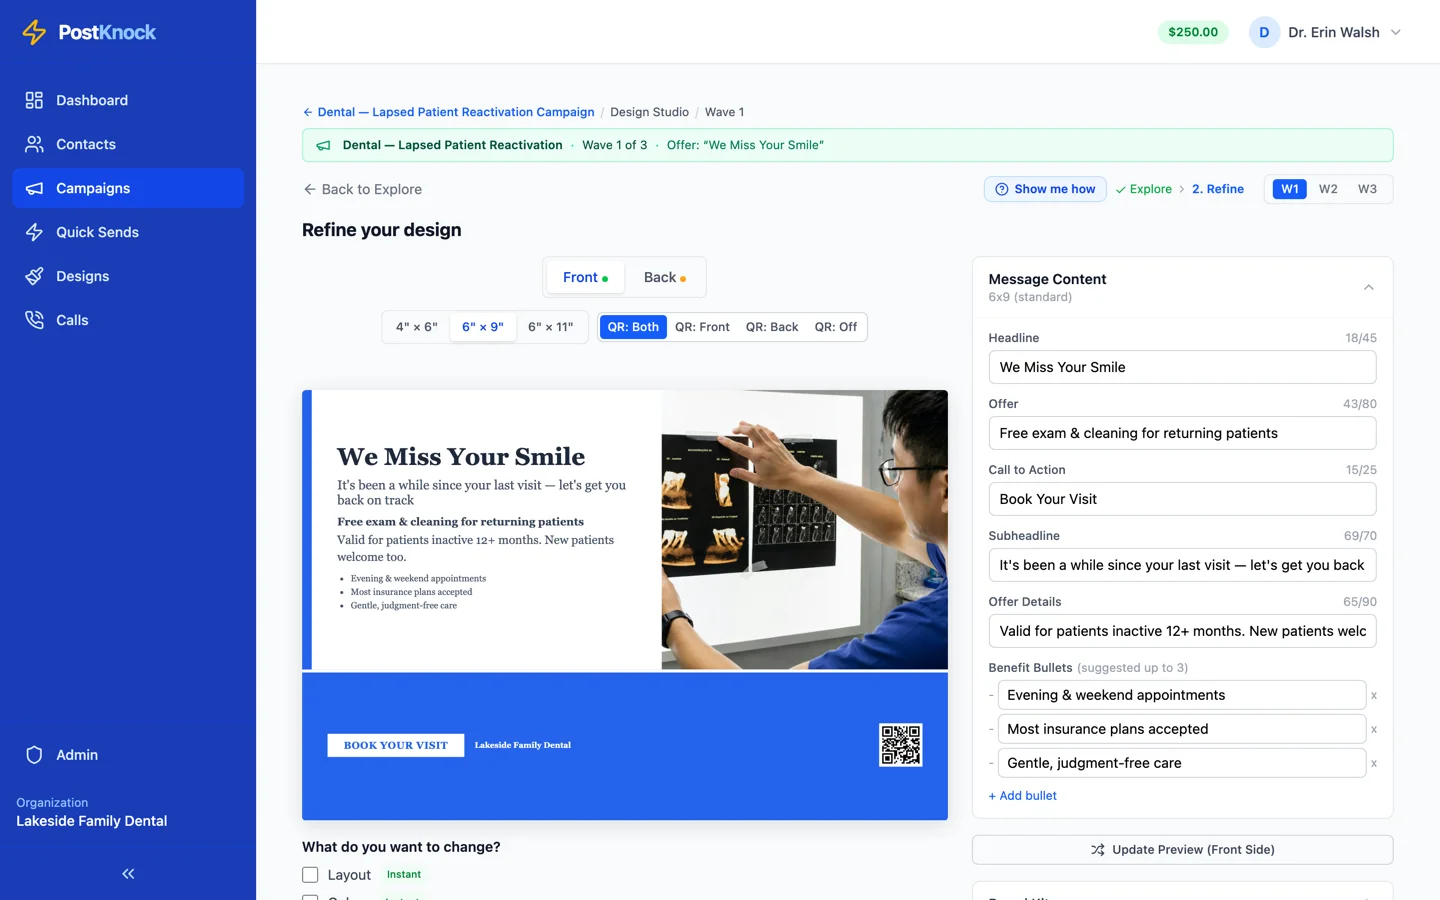
This is where you edit the actual words. Message Content holds the headline, subheadline, offer, CTA and bullets; edit them and click Update Preview to see the result. You can also switch postcard size here and choose where the QR code goes — front, back, both or off.
If Apply Design is greyed out: you haven't looked at the back yet. The button stays disabled until you've opened both the Front and Back tabs at least once. It's deliberate — the back is where the address block and QR code sit, and it's the side people forget to check before committing to a print run.
Click Apply Design and you're back on the campaign page.
Approve a print proof
Applying a design isn't the same as approving it. The checklist item now reads Proof Your Design with a Review & Approve button. Clicking it renders your design to a real print PDF through our print partner and shows you the result.
Expect this to take a minute or two the first time. You can close the dialog and it keeps rendering in the background.
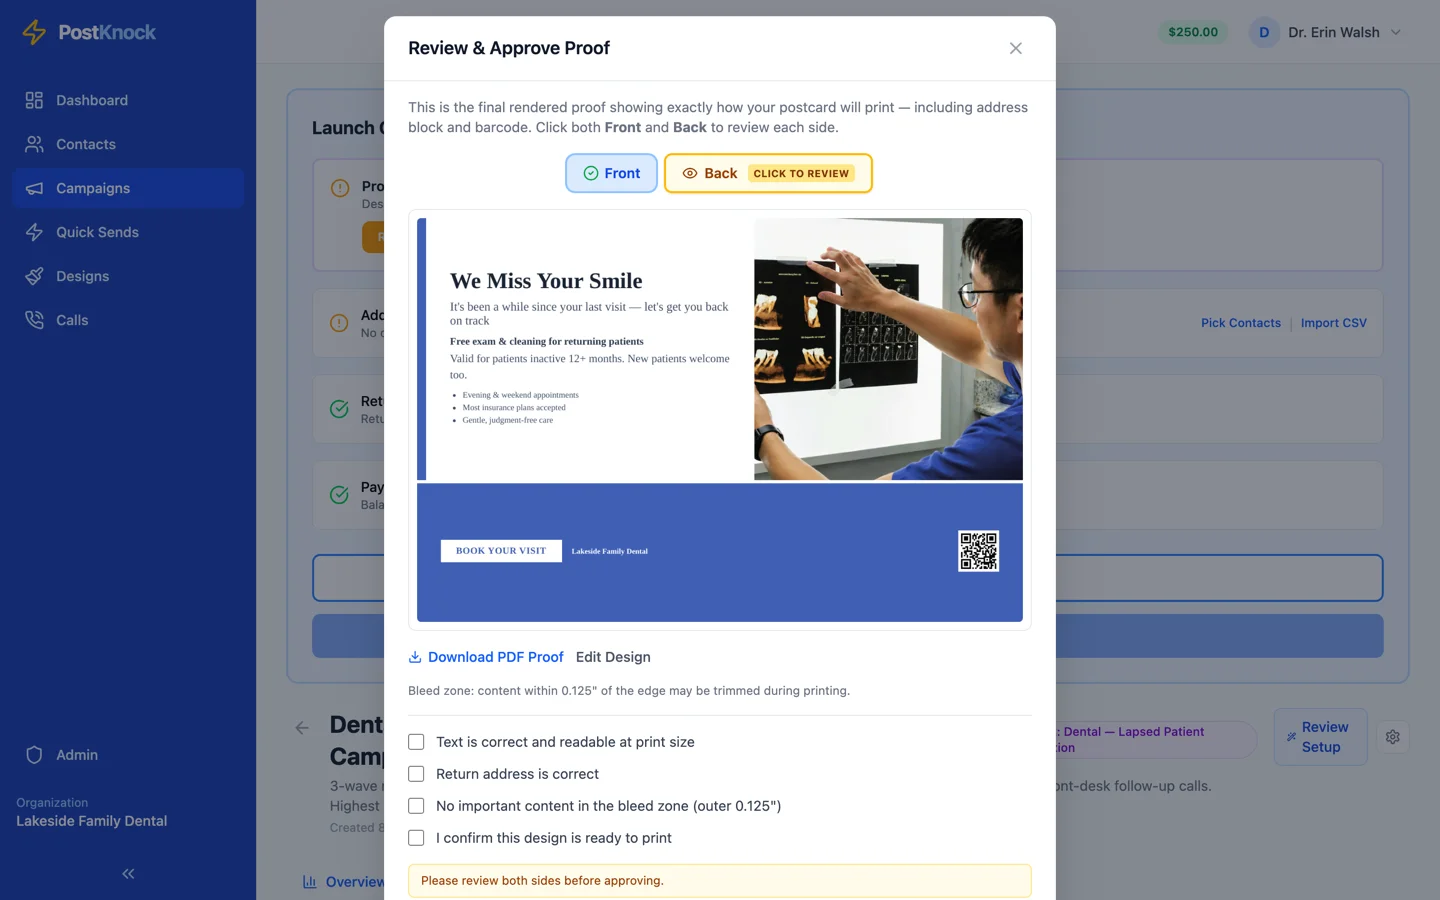
This is the last point at which mistakes are free, so slow down here. Read the headline at actual size rather than skimming it. Check the return address is the one you want on the card. The bleed warning matters: anything within 0.125" of the edge can be trimmed off during printing, so a logo or phone number sitting right on the margin may not survive.
Tick all four boxes, review the back as well as the front, and approve. If you change the design afterwards, the approval resets and you'll need to proof it again — which is the point.
Contacts, return address and wallet
The remaining three items are quick. Pick Contacts attaches a list to the campaign, either from contacts you already have or a fresh CSV import. Set Address opens the return-address form; if you have several locations, the one you mark default is used unless you say otherwise. Payment just needs a positive wallet balance — you're charged per piece as cards actually mail, so you don't need to fund the whole campaign up front, though a balance that runs dry mid-campaign will pause the send.
Part 3: Review setup and launch
A four-step confirmation pass over everything you just built.
Even with all four checklist items green, the Launch button stays locked until you've been through Review Setup once. It's a last look at the things that are expensive to get wrong.
Designs & scripts
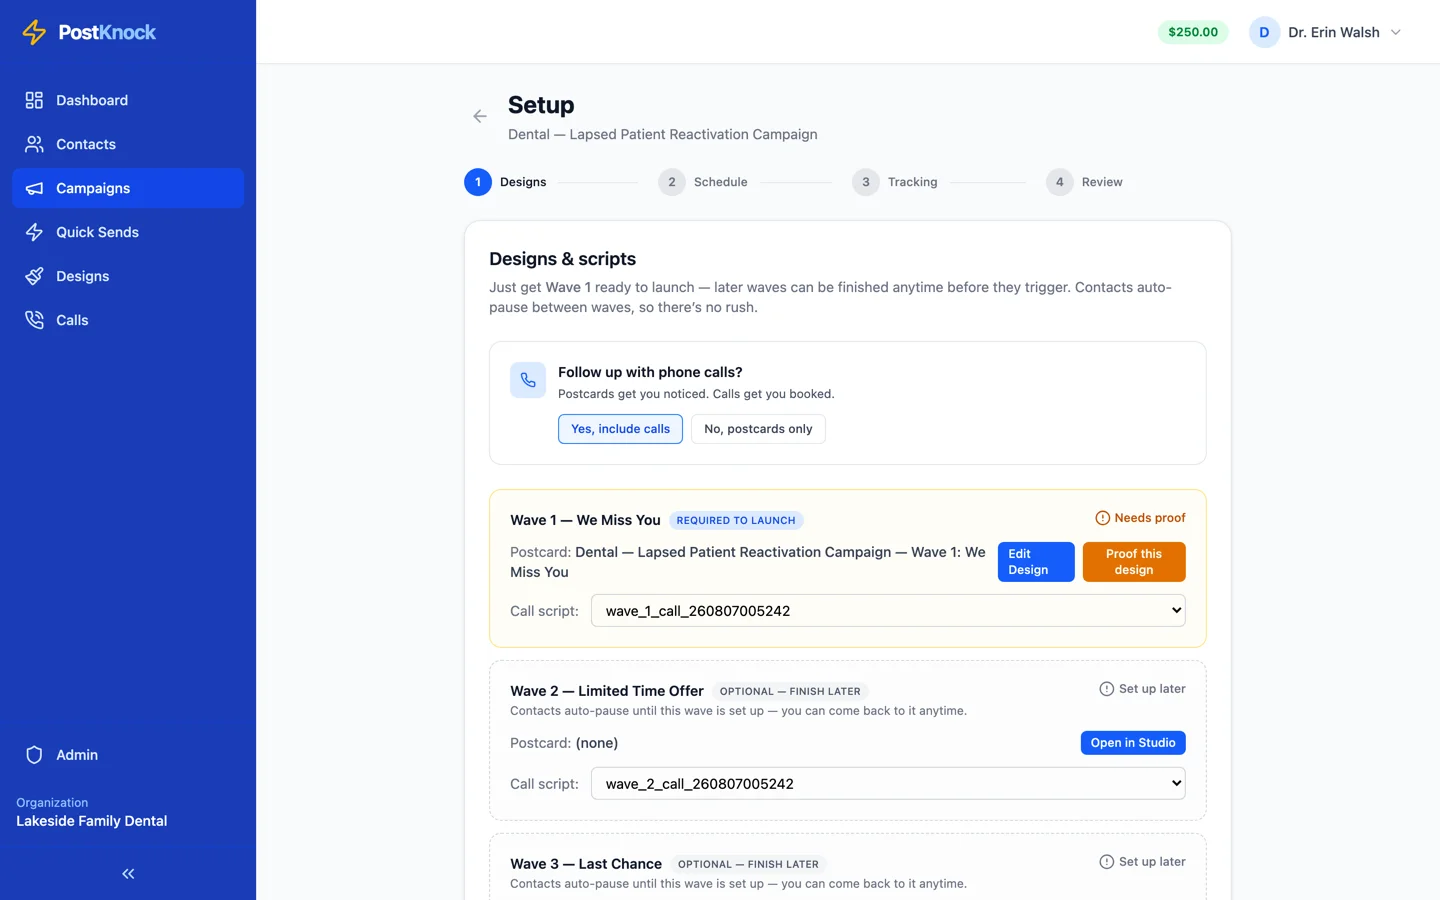
This is the step people misread. You do not need all three waves designed to launch — only wave 1 is marked Required to launch. Waves 2 and 3 say Optional — finish later, and if a wave isn't ready when its turn comes, contacts pause in front of it and resume automatically once you've proofed it. That's the intended way to use it: get wave 1 in the mail this week, build wave 2 while wave 1 is in transit. This step is also where you confirm whether the campaign includes phone follow-up at all.
Postcard delivery
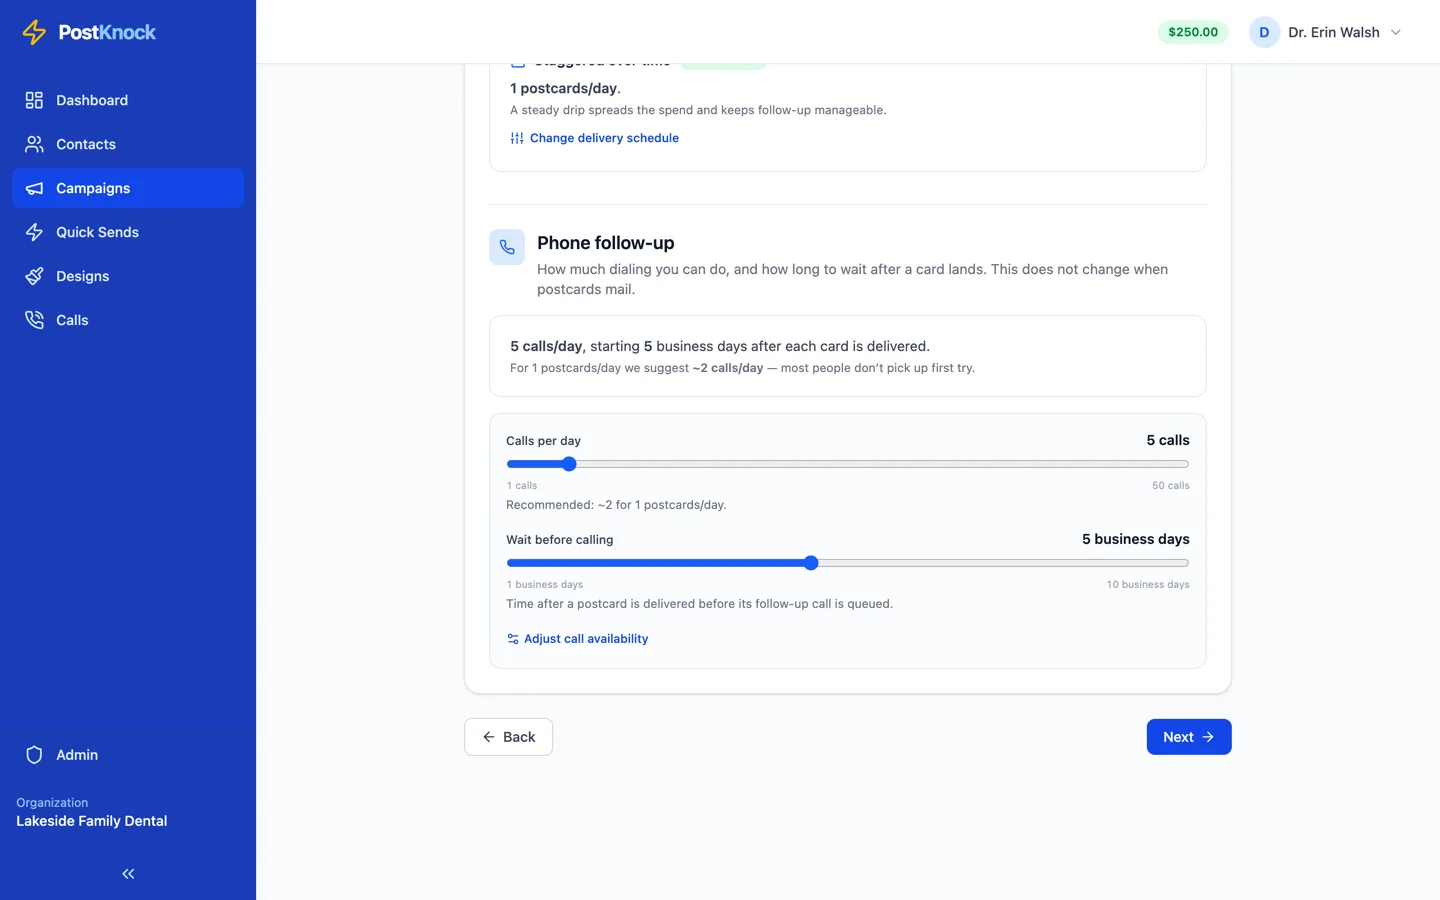
Here you set how many cards go out per day and, if the campaign includes calls, how much call volume your front desk can realistically handle. Be honest about the second number. A call queue that generates more callbacks than anyone has time to make is worse than a smaller one that gets worked properly.
QR & link tracking
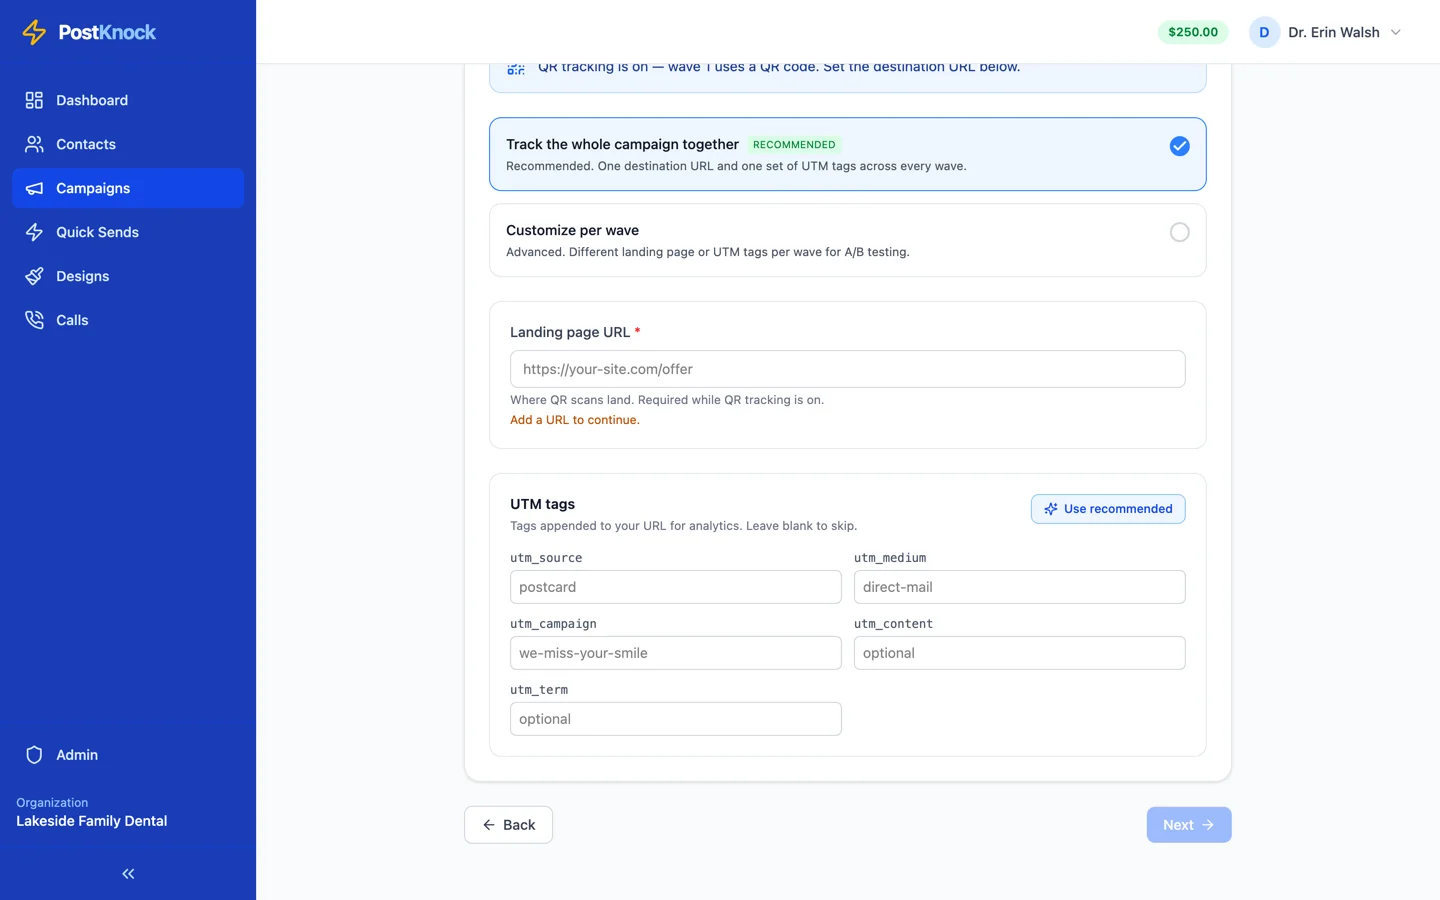
The QR code on your postcard needs somewhere to go. Point it at your booking page or a specific landing page rather than your homepage — someone who scanned a card about a lapsed-patient offer should land on something about that offer. PostKnock fills in sensible UTM tags so the traffic shows up as direct mail in your analytics instead of vanishing into "direct". You can't advance past this step without a destination.
Review and launch
The final step, Ready to launch?, is a plain-English summary of everything above: whether phone follow-ups are on and how many waves have a script, your daily postcard and call volume, how call timing works, your tracking destination, your return address, and a per-wave list showing which designs are proofed.
That wave list is the last useful check — expect to see wave 1 marked proofed and later waves marked as having no design yet. That's fine and it's what lets you launch today. If the summary reads right, click Launch campaign. If you'd rather sit on it, Save (don't launch) keeps everything and leaves the campaign in draft, with the Launch button live whenever you come back.
What happens after you launch
Cards start going to press in daily batches at whatever pace you set. First-Class delivery typically runs three to five business days from the drop date, so the first scans and phone calls show up about a week after launch, not the next morning.
From there the sequence runs itself. Each wave fires after its configured gap, contacts move through the waves individually, and anyone who hits a wave that isn't proofed yet waits rather than getting skipped. The Timeline and Tracking tabs on the campaign show what's mailed, what's been scanned and what's queued for a call.
Snags that come up
- The Launch button says "Complete setup review first." All four checklist items can be green and the button will still be locked until you've walked through Review Setup once.
- Apply Design won't click. Open the Back tab. Both sides have to be reviewed.
- The proof looks like it's stuck. Rendering takes a minute or two on a fresh design. Close the dialog — it finishes in the background and the design gets marked ready.
- Contacts didn't get enrolled. Contacts without a usable mailing address are held back. Check the campaign's Contacts tab for anything flagged, and fix the addresses rather than overriding them.
- Only wave 1 is sending. Expected on the Free plan — you can author every wave but only the first one mails. Multi-wave sequences and phone follow-up are Pro.
Ready to build one?
Free plan, no monthly fee, no minimum. You only pay for cards you actually mail.
Start FreeWas this helpful?
If something in this walkthrough didn't match what you saw on screen, tell us which step — that's usually a sign the product moved and the article didn't.
Need more help? Email support@postknock.com and we'll respond within one business day.